 (but thats why there are lots of pics here
  )
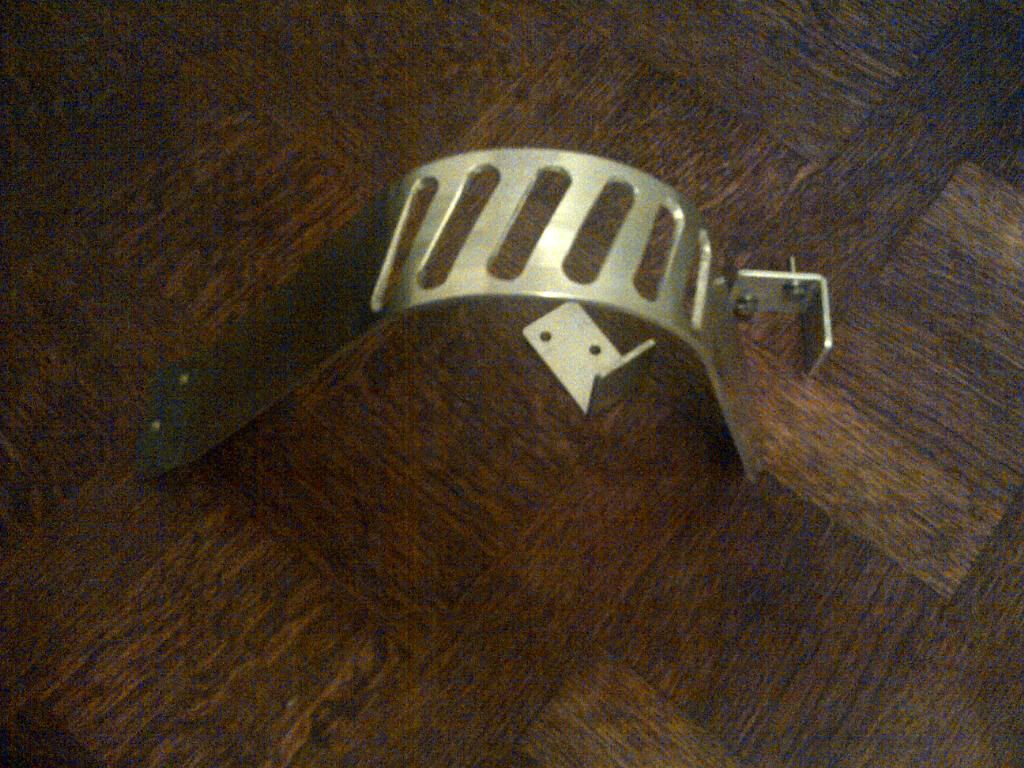
I also rather over specified the aluminium (5251) so its rock hard. On Lee's car, the one on which the guard is mounted in the above pics, if you try to move the guard the engine moves first.
)
I also rather over specified the aluminium (5251) so its rock hard. On Lee's car, the one on which the guard is mounted in the above pics, if you try to move the guard the engine moves first. 

Newbie
Posted 13 November 2011 - 09:34 PM
(but thats why there are lots of pics here )
I also rather over specified the aluminium (5251) so its rock hard. On Lee's car, the one on which the guard is mounted in the above pics, if you try to move the guard the engine moves first.
Scary Internerd


Posted 13 November 2011 - 09:37 PM
oh and its taken me ages to make two. The jig to get the bend right took bloody ages too. So I may take some persuasion to make anymore.
I also rather over specified the aluminium (5251) so its rock hard. On Lee's car, the one on which the guard is mounted in the above pics, if you try to move the guard the engine moves first.
Newbie
Posted 13 November 2011 - 09:51 PM
So you do it all in your garage! Fair play, I always assumed you must have access to a machine shop or something!Where do you get your materials from?
Iceman

Posted 13 November 2011 - 09:58 PM
 Top work though
Newbie
Posted 13 November 2011 - 10:08 PM
Moderator

Posted 13 November 2011 - 10:11 PM
you still need to move the fuel linesAs it's got to be easier than moving the fuel lines.

WANNABE MY LOVER

Posted 13 November 2011 - 10:17 PM
 Let me know if you do go into production. I'd considered a kevlar shield but yours is top drawer!
Iceman
Posted 13 November 2011 - 10:24 PM
 No rush I'm guessing? I'll knock you out a decent title block too if you want?
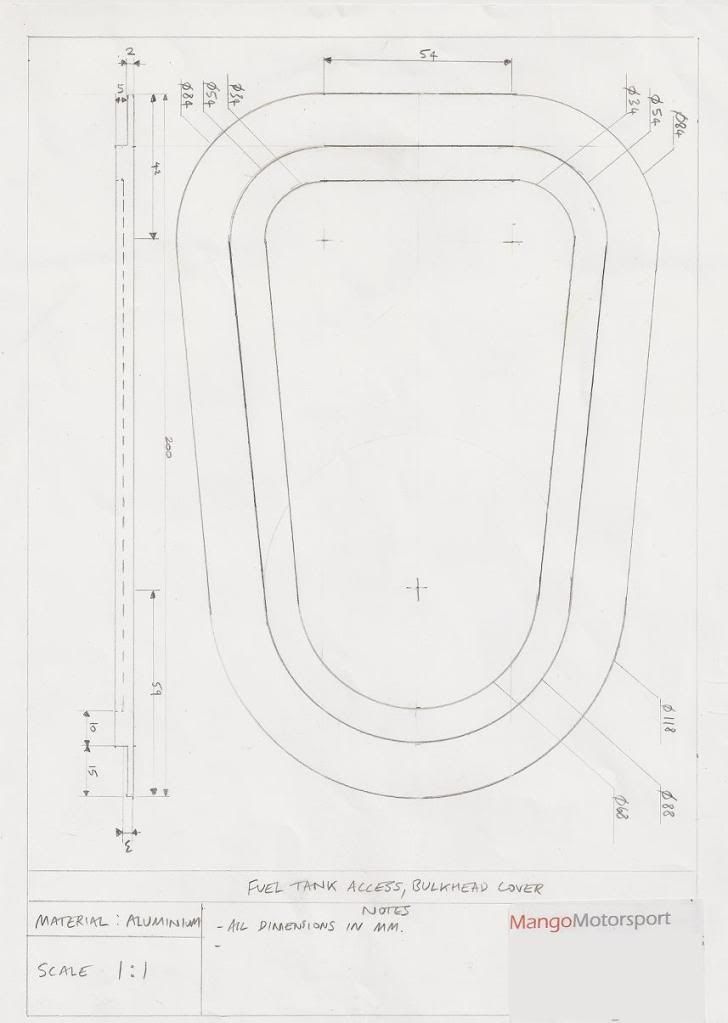
PS: Stupid question; why is the flange 2mm at the top and 3mm at the bottom?
No rush I'm guessing? I'll knock you out a decent title block too if you want?
PS: Stupid question; why is the flange 2mm at the top and 3mm at the bottom?
Newbie
Posted 13 November 2011 - 10:29 PM
And yes, my title block is shameful.
Newbie
Posted 13 November 2011 - 10:32 PM
Top job JG.
Let me know if you do go into production. I'd considered a kevlar shield but yours is top drawer!
Iceman
Posted 13 November 2011 - 10:36 PM
I'll sort you out something in the week
Newbie
Posted 13 November 2011 - 10:39 PM
 )
However, If i can send you a similar std of drawing to this for a couple of projects, then your help would be very much appreciated
)
However, If i can send you a similar std of drawing to this for a couple of projects, then your help would be very much appreciated
Iceman
Posted 13 November 2011 - 10:51 PM
If you want anything more fancy on the Mango title block give me a shout
Newbie
Posted 14 November 2011 - 10:19 AM

Whipping Boy

Posted 14 November 2011 - 10:36 AM

Newbie
Posted 14 November 2011 - 11:17 AM
SuperCharged Karting Super Hero

Posted 14 November 2011 - 11:24 AM
Whipping Boy
Posted 14 November 2011 - 11:30 AM
Newbie
Posted 14 November 2011 - 08:33 PM
Supercharger of Doom

Posted 14 November 2011 - 09:09 PM


0 members, 2 guests, 0 anonymous users

