Was thinking of mine. Forgot you widened yours.
So if yours is 182 I should look for a trailer that is not under 180 to be slightly on the safe side.

Honda K24 Powered Speedster
#741

Posted 29 October 2018 - 03:36 PM
#742

Posted 17 February 2019 - 08:18 PM
So soon soon I will prepair the car for season 2019.
I´m in an idea to add a bigger rear brake caliper. But to be sure
I dont get to much brake force at rear I want to add a reducing valve.
Question is can I put a single valve on one of the lines between master brake cylinder and ABS unit (red)?
Or a dubble valve on both rear going pipes between ABS module and rear Wheels (Green in Picture)?
https://dalhems.com/...2R5OnfQXWglRYIc

Br, Per
#743

Posted 18 February 2019 - 07:48 AM
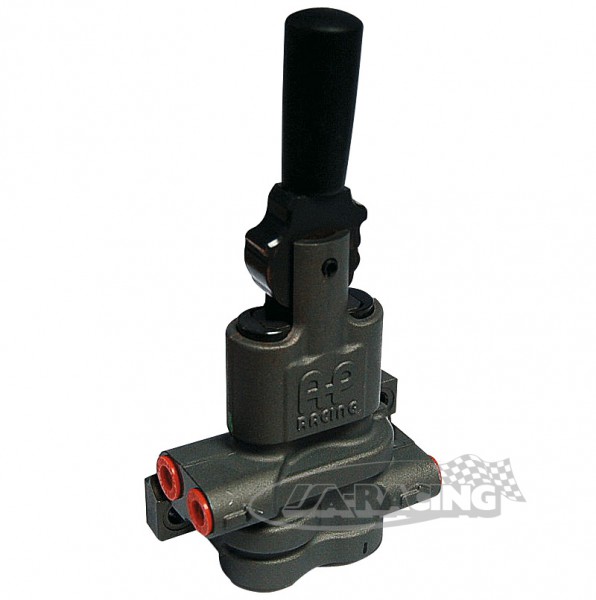
You need a twin-circuit valve in the lines going back.
Eg: https://www.isa-raci...mit-hebel?c=465

Otherwise the pressure pump in the ABS unit can/will still pump up the pressure to the rear brakes in some conditions.
Tricky part on the Speedster/VX is that unlike the un-assisted S1/S2 Elise, the brake lines to the back go along the sides of the car so this adjuster would be hard to fit inside the cabin.. If you want it in the cabin (to adjust on the fly) you may need to re-run the brake pipes front-back through the handbrake tunnel and then up and over the fuel tank like on the un-assisted S1/S2 Elise brake setup (just using parallel pipes for left and right rear).

Bye, Arno.
#744

Posted 18 February 2019 - 08:11 PM
But why cant I place it before ABS pump.
The ABS will not engage until the wheels lock up anyway.
And that valve was super expensive.
I can place 2 single valves instead. A lot cheaper.
#745

Posted 19 February 2019 - 07:55 AM
But why cant I place it before ABS pump.
The ABS will not engage until the wheels lock up anyway.
True, but it also has a built-in brake-force distribution that's active all the time, so even if you reduce the input pressure on the rear circuit it may well compensate and negate most of your adjustment.
And that valve was super expensive.
I can place 2 single valves instead. A lot cheaper.
Yes you can, but you should not.
The reason this valve is so expensive is that it can balance both circuits at the same time and make sure it's providing the same pressure on both (left and right) circuits.
With 2 separate valves there will always be slight differences in manufacturing and response so you will likely end up with 1 rear wheel getting more pressure than the other. Not something you'd like...
Bye, Arno.
#746

Posted 19 February 2019 - 09:51 AM
does this k24 actually drive?
#747

Posted 19 February 2019 - 02:38 PM
Every summer the last 3 or 4 years.
I need to be better upload event pictures.
:-)
does this k24 actually drive?
#748

Posted 24 February 2019 - 03:12 PM
Trailer is ready.
New shocks, new Wheels, 8cm wider, some new lamps and rust removed.
Hopefully it will do it´s job in 2019.

And a proof the car have been used in action in 2018 on Kinnekulle ring.
With a new personal best, still not under the magic 1 minut, but it will happend this year :-)

Since trailer is ready and is out of the garage, the Project is in the garage.
Yhea same old Speedster waiting for new updates.
 .
.
First Wheel be mounting on my steering Wheel I bought in 2012.
And some aero mods.
#749

Posted 24 February 2019 - 06:03 PM
Anyone here who have mounted aerocatch lock on there speedster in the middle for the front hood?
And have some pictures to show of the process and when it´s ready?
#750

Posted 17 March 2019 - 04:44 PM
So I added the aerocath on the front hood.
Hopefully it wont open on trackdays anymore.

Now I will try to do the same on the rear, we see how that goes.
I finally took some time to mount my hard top.

I found all mounts and seals I bought and opened them up.
But my luck was….. limited.
I thought I bought the right mounts, but I cant see how they could fit.
These are the mounts I have, I have some more but they look the same/ are mirrored.
I was realy looking forward to use the hardtop this year, but now I´m not sure.
Can anyone help me?

Maybe it´s better to make my own mounts.
Edited by Aerodynamic, 17 March 2019 - 04:45 PM.
#751

Posted 17 March 2019 - 05:05 PM
#752

Posted 17 March 2019 - 07:49 PM
Thank you.
Br, Per
Your mounts do look very similar to one so should work.Let me know if a picture of a mounted hard top would be of any help.
#753

Posted 18 March 2019 - 05:33 PM
I think I only miss these parts.
Anyone have any spare?

Standard car service need to be done before season starts.
So I though I buy the best oil there is, atleast this is what I belive.

And Always use OEM oil filter + some OEM gearbox oil

Not so much going on this year so I decided that this year
I should change my steering Wheel I bought back in 2012.
After testing I thought the steering Wheel came to Close to the dash
about 5mm closer than the OEM which is worng direction to what I wanted.
So a 25mm steering Wheel spacer is ordered.
But the hub is fitted after some violence.

#754

Posted 19 March 2019 - 06:19 PM
How have others solved this? A horn button on the dash panel or a wire through the hub.
Also this thing sticking out from the hub to control off function of side indicator.
On the OEM steering wheel its pointing to 1 o clock, but on the aftermarket hub its like 3 o clock when using the top marking. What should it be? Im not sure I have disconnected the OEM.
#755

Posted 19 March 2019 - 07:40 PM
I got 2 small packages today.
Thats why I went to the garage trying to install the steering wheel with the new spacer.
Anyone knows if there is a guide installing a aftermarket steering Wheel?

And a hoose to fix my coolant leaking issues.
#756

Posted 20 March 2019 - 07:38 AM
I was just down in the garage. And dont know how to install the horn function. I thought i got power through the hub. But its through a connector.
How have others solved this? A horn button on the dash panel or a wire through the hub.
Also this thing sticking out from the hub to control off function of side indicator.
On the OEM steering wheel its pointing to 1 o clock, but on the aftermarket hub its like 3 o clock when using the top marking. What should it be? Im not sure I have disconnected the OEM.
Depends on the hub you are using...
If you use the 'airbag' version of the hub (later Corsa models) then it should work with the clock-spring that was originally fitted and that should have the wires for the airbag and for the horn too.
If you use the non-airbag hub (older Corsa models, same as Elise) then you will need to change to the sliding contact ring used on these cars for the horn and rewire on the steering column to remove the clockspring and it's connections and move the horn wire to the spring-loaded contact on the column.
Ground for the horn ciurcuit is then via the steering column itself.
The sliding contact ring is here on the diagram as part 5 and the spring loaded pin can be seen on the top of part 6:

For cancelling the indicators, just rotate the hub on the steering shaft so the tab is pretty much in the same spot as the one on the orignal steering wheel. The 6-bolt pattern for the steering wheel should allow 30 degree steps so normally not really an issue.
Bye, Arno.
#757

Posted 21 March 2019 - 04:47 PM
#758

Posted 23 March 2019 - 01:47 PM
Almost s good as flow wiz.
Real dirt. :-)

And then finally, I want some downforce.
I wanted to drive for years now with downforce.
Before 
Here it is tested.


I Think it came out quite good, I´d wanted it slightly lower.
So if I fix new mounts for 2020 Id do them slightly thinner and lower.
Mounts are adjustable in 5 or 6 steps. This is something in the middle.
More next time.
#759

Posted 23 March 2019 - 01:57 PM
And yes, I can still Open my rear hood.

Edited by Aerodynamic, 23 March 2019 - 01:57 PM.
#760

Posted 23 March 2019 - 04:32 PM
how much projection beyond rear bodywork , I was told 100mm is the limit
12 user(s) are reading this topic
0 members, 2 guests, 0 anonymous users
-
Bing (10)


