

There's quite a lot of threads on the forum about this, the best way, the best sealant etc etc so anyone thinking of doing this then it's worth doing a little bit of research via the search function. Lots of useful advice for what, now, seems so bloody simple!
So, took my first light out this afternoon, drivers side headlight. All of 2 minutes to do. Threw the nut away as that will be replaced with a wing nut to avoid a spanner next time
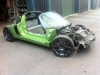
 Pics are attached, sorry for the poor quality. You can see the massive gap in the original sealant where I've put a screwdriver in and wedged it, no wonder it was leaking!
Used the oven technique, warmed the oven up to about 120 and popped the light in for about 3 minutes to help make the old glue sticky and easy to work with. Light was quite warm when it came out, but the lens came off soo easily (except one bit where a previous owner used feckin superglue on it!). A combo of a knife and a screwdriver to help wedge the gap open worked a treat.
Total time about 15 minutes!
So, removed the old sealant, wiped down and given a light sand over the rough bits then used Tiger seal followed by lots of clamping.
There's quite a lot of comment on getting the lens fitted correctly. I marked the lens and the casing before I removed it with a marker pen. Then simply refitted it. Having tested it back on the car the fit is the same so I'd recommend that.
3 lights to go..........should be all finished by tomorrow.


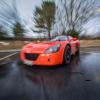
 Got to be able to at least try and keep up with you on the straights when we're tracking the cars this year
 Glad to hear the beast is back tho matey