Send me a PM, a few people are after sets so I'll plan it all and order the material in. Sent from my P027 using TapatalkI'm interested in a front set + rear arches too.

Pre Cut Diy Paint Protection Shields.
#201

Posted 02 March 2017 - 01:21 PM
#202

Posted 02 March 2017 - 01:22 PM
That's useful feedback, thank you. Would still appreciate the photo's Pezley, if you can?
What's the lead time on getting a front set?
[/quote]
A couple weeks from payment at the moment. Would need to order material in etc
Sent from my P027 using Tapatalk
#203

Posted 02 March 2017 - 01:37 PM
#204

Posted 03 March 2017 - 01:07 PM
PM'd
#205

Posted 06 March 2017 - 08:58 AM
How far does the upper clam one cover ? I'm after just front clam ones , no lights or mirror's tho Sent from my SM-G900F using Tapatalk
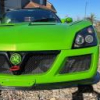
Upper clam goes from the bottom of the lip (directly above the 'V') to half way up the headlights, and across the bonet in a slight downward curve. Will try to get a better photo example
#206

Posted 06 March 2017 - 09:45 AM
I have responded to everyone. If anyone is local to Portsmouth area I'm always happy to help with fitting.
if anyone wants any soon then I will be placing an order for material on Wednesday
Also, for those Lotus owners here, will have Elise, Exige and Evora kits ready soon ![]()
#207

Posted 14 March 2017 - 09:47 AM
For the guys who have paid with in the past week, the material has been ordered.
#208

Posted 10 April 2017 - 08:59 AM
Anyone who has paid up will have theres in their hands today/tomorrow.
I have enough material for two full kits left if anyone is in need.
Lotus one's available also
#209

Posted 10 April 2017 - 10:40 AM
hi... can you just do a front lower section and bonnet lip please?
#210

Posted 10 April 2017 - 10:56 AM
hi... can you just do a front lower section and bonnet lip please?
PM'd
#211

Posted 12 April 2017 - 05:18 AM
#212

Posted 12 April 2017 - 05:52 AM
To fit, I'd recommend putting aside maybe an hour, no more should be necessary. The flast lines of the VX make this a rather easy job. Step 1 - Clean the paint work. Use a quick detailer and something to rid the paint of and dirt and grime. Step 2 mix up some hand soap and water, the more hand soap used the longer it will take to dry, just a few drops will be enough for a small spray bottle Step 3 - Liberally spray the car section, spray your hands to avoid getting any dry finger prints on the adhesive then peel off the material from it's backing. Spray the sticky side and lay it on the car in position. Step 4 - When material is in place and you are happy with it's positioning, take a debit card and wrap it in a thin cloth. Gently apply pressure and start to squeeze the liquide out from centre to the edges. The more liquid removed the firmer grip the adhesive will have. Keep this up until the material is strongly held in place and all liquid/bubbles are removed. ** tips** if you find the edges wont stick down, use a hair dryer on them whilst squeezing the water out, the hair dryer will help secure the adhesive quicker. The heat will also make the material more workable incase you are struggling to bend it over certain curves of the car Step 5 - Leave the car a few hours, preferably in the warm for the excess liquid to dry up If anyone has done this before and has any further tips, please speak up ! This was a project in the beginning so I am by no means an expert at this, I just wanted to provide a cheaper method to protect our paint.
#213

Posted 12 April 2017 - 05:56 AM
#214

Posted 12 April 2017 - 08:31 AM
#215

Posted 12 April 2017 - 08:32 AM
I realise I've probably missed the boat but I'd love a lower clam section if there happens to be one spare Sent from my iPhone using Tapatalk
Send me a PM, I have some material left at the minute.
#216

Posted 12 April 2017 - 08:41 AM
Received mine yesterday thanks. Is there anyone in Wilts area also doing this for first time and want to fit the kits together? Thanks
Thanks for posting up the instructions.
A few tips
-If you have them, start with the rear wheel arches, these are the flattest pieces that need the least manipulation, it will give you a good idea of where to start with out being difficult.
- Leave the bonet lip till last, experience from the other pieces will help, due to the shape of the nose on the VX, there will be a crease on the lower portion of the nose where there is excess material. This is not a problem, just use a hair dryer and the material will shrink, it can always be stretched if needed, it has a memory to it like vinyl. It's also a lot tougher than vinyl in that it's harder to burn through if you do heat it too much.
- Drown the piece and the panel in a soapy solution (water and baby shampoo works great, some hand soaps and things like fair liquids have degreasers which can break down the adhesive over time). You can't put too much solution on but you can put too little.
If anyone gets stuck when applying, PM me. I'll keep an eye on them and try to reply as quick as possible, if you get super duper stuck send me your number and ill give you a bell so you can ask any questions ![]()
#217

Posted 14 April 2017 - 07:14 AM
I realise I've probably missed the boat but I'd love a lower clam section if there happens to be one spare Sent from my iPhone using Tapatalk
Send me a PM, I have some material left at the minute.
PM sent
#218

Posted 14 April 2017 - 06:37 PM
Hi just wondered if you are still doing these sets? Appreciate a reply thanks Ade
#219

Posted 05 July 2017 - 01:21 PM
If anyone requires any kits, I am ordering material soon for a few buyers here, I can add any extra orders into this one
#220

Posted 07 July 2017 - 05:35 AM
1 user(s) are reading this topic
0 members, 1 guests, 0 anonymous users


