#1
Posted 17 August 2014 - 08:10 PM
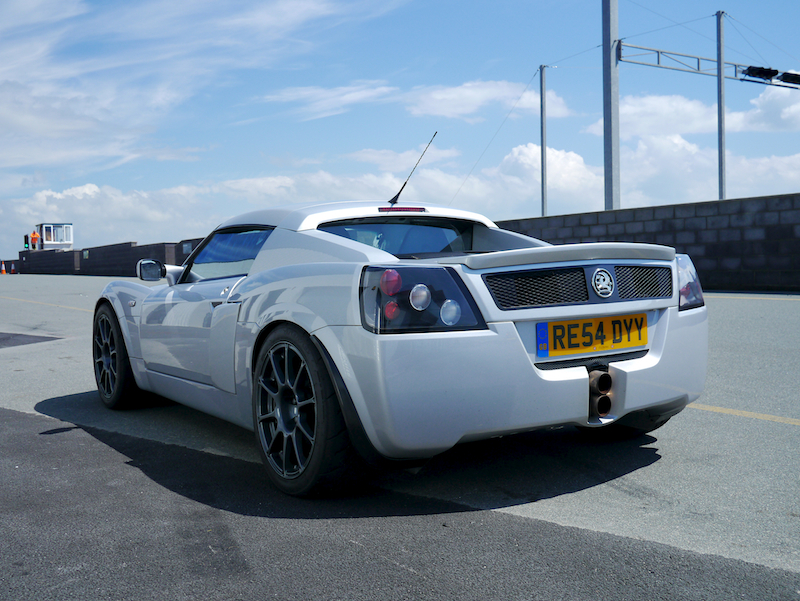
Tried the pressed out style of mesh fitting and promptly gave up trying to get it perfect all the way around. Couldn't be bothered with creating any recessed lips or anything as I didn't want the expense of a re-spray so just opted for the set back painted cut edge which I actually think looks OK anyway.
Not sure if I'm going to bother but it would be simple enough to install two additional parking sensors somewhere here to improve on my semi stealth number plate ones.
Secondly moving up the clam to something I don't think anyone has really done before, my boot mod.
First job was to remove the black plastic number plate light covers that are bonded onto the inside of the clam. This was a real PITA and took some time as you need to be careful not to be to rough for risking damage.
Eventually got them out the way and installed new slim LED ones.
Next was the point of no return, the main hole cutting.
Ran with it blocked up for a while and it was funny seeing peoples reactions in the rear view mirror to this!
Dibond type composite sheet used to strengthen the hole and act as a recessed frame for the grilles etc.
#2
Posted 17 August 2014 - 08:11 PM
Removable access panels with wing nuts for the occasional clean up of the inside surfaces and for the fitting of the heat extraction duct.
I intent to have this removable tunnel (to retain full boot space) installed inside. Made from carbon fibre and lined with reflective heat proof tape.
Haven't actually fitted it yet as although it should give the grilles an actually useful function I'm not sure to what extent or if there will be any cooling benefit at all?
#3
Posted 17 August 2014 - 08:39 PM
you should of cut the bottom holes with the same curvature as the edge.
#4
Posted 17 August 2014 - 08:40 PM
I have a number of rear badges to try and have not really decided which I like the look of most.
I'm in two minds about the carbon fibre surround. It is only a thin veneer so could be easily replaced or painted. The slight thing that gets me is the way the lines of the weave get a bit 'lost' against the holes in the mesh. I think a solid gloss colour would give a more distinct border? You can see what I mean with the way the right hand side of this photo has come out, gloss black to match the tail light edges?
#5
Posted 17 August 2014 - 08:43 PM
Do you mean the top middle-ish edge as I lined this up to continue with the seam around the headlights.you should of cut the bottom holes with the same curvature as the edge.
#6
Posted 17 August 2014 - 08:44 PM
edit; nevermind this was in between your updates.
Edited by smiley, 17 August 2014 - 08:45 PM.
#7
Posted 17 August 2014 - 08:51 PM
Do you mean the top middle-ish edge as I lined this up to continue with the seam around the headlights.you should of cut the bottom holes with the same curvature as the edge.
for some reason i didnt actually finish what i wanted to say.. lol
as the edge..... of the numberplate area.. lol
#8
Posted 17 August 2014 - 08:57 PM
Ah, I get what you mean now. IIRC I did think about that at one stage once I had got to what you see now as my finished shape. Obviously I could have taken a bit more off but could not put any more back on again so as I liked the sharper curve I had I just stuck with it.for some reason i didnt actually finish what i wanted to say.. lol as the edge..... of the numberplate area.. lolDo you mean the top middle-ish edge as I lined this up to continue with the seam around the headlights.you should of cut the bottom holes with the same curvature as the edge.
#9
Posted 17 August 2014 - 08:58 PM
#10
Posted 17 August 2014 - 09:07 PM
Bloody hell Graham, you've got no rear clam left
OTT maybe but personally I think everything works quite well? If you look at my second photo down you can see why I was never a fan of such a large plain flat area (I know it's made worse by having no griffen badge but even so)
#11
Posted 17 August 2014 - 09:10 PM
#12
Posted 17 August 2014 - 09:26 PM
#13
Posted 17 August 2014 - 09:29 PM
I have absolutely no idea what's going on in those pics. What's the carbon tube in the boot all about?
#14
Posted 17 August 2014 - 09:30 PM
#15
Posted 17 August 2014 - 09:33 PM
Interested in the tunnel design also.
Cutting the boot space at the engine side openes up an area that is very heat intensive. (downpipe/turbo area)
Edited by smiley, 17 August 2014 - 09:34 PM.
#16
Posted 17 August 2014 - 09:35 PM
Danger7's boot vents are the most professional I've seen. Detachable pipework for those as well, when not required.
#17
Posted 17 August 2014 - 09:39 PM
Danger7's boot vents are the most professional I've seen. Detachable pipework for those as well, when not required.
Any pix of the pipework available?
#18
Posted 17 August 2014 - 09:39 PM
#19
Posted 17 August 2014 - 09:52 PM
Any pix of the pipework available?
There's probably some on here somewhere, I didn't look particularly hard to find a pic of Ian's car and that was the first I came across. From memory, it's just flexible hose type stuff but it's probably been five or six years since I had a snoop in his boot.
#20
Posted 17 August 2014 - 09:58 PM
Spookily familiar. Even the same version of primer as well. It's a rare sight on the UK's roads as Ian lives and works in Germany and tends to only come over in his VX for the National. It's a German tuned (not Klassen but one of the other, Regelin maybe) stage über turbo.FFS that's damn near identical design to what I have done! I thought I had come up with something a bit different! Anymore info on that car, wish I had seen it before starting mine.
Also tagged with one or more of these keywords: cut outs, vents, grilles, boot clam
The Market Place →
Group Buy Room →
New T7Design Heater For The Vx220Started by 'Buchos' , 05 Mar 2017 heater, fan, hot, cold, air and 5 more... |
|
|
||
The Market Place →
Car Parts Wanted →
Na Side Vents / Meshes / GrillesStarted by rsg , 23 Jan 2014 grilles |
|
|
1 user(s) are reading this topic
0 members, 1 guests, 0 anonymous users