Jump to content


Photo

Putting The Car Together After A Crash


  • Please log in to reply
11 replies to this topic

#1 meldert

meldert

    Billy No Mates

  • PipPipPipPipPip
  • 1,284 posts
  • Gender:Male
  • Location:Eskilstuna, Sweden

Posted 23 July 2006 - 11:52 PM

Well, I have been promising, in all kinds of different posts, that I would write this thread so here it is. Now I have finally got the car back together again and I can look back at this story with some distance. Not sure if this is the right place but I made a lot of mods when rebuilding it so I guess this is the place...

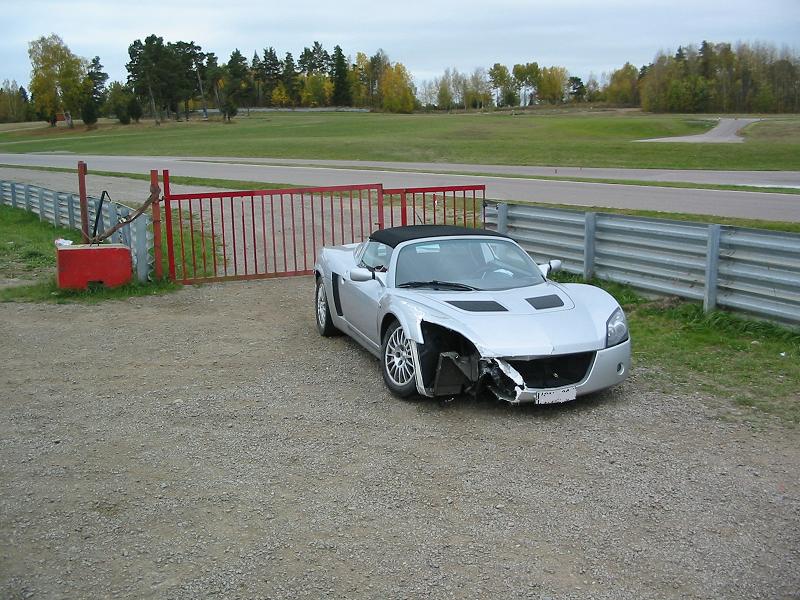
As I said I managed to spin the car and put it in the armco on a track last autumn. The car pretty much took the hit directly onto the right side, hitting first the front corner, then the rear corner (or maybe the other way around) befor bouncing out on the track again and over to the other side... The impackt was quite hard but amazingly there wasn't that much damage as you would have expected from the impact (as I will show later).

Beeing a lhd car, you would thing that taking a hit from the right wouldn't hurt much, but for the driver (me) it was probably the worst way. I fell to the side and by that i missed the airbag and almost fell out of the seatbelt and somehow managed to crack a rib on my right side, perhaps hitting the gear stick or brake lever... Well I healed up in couple of month so that wasn't much of a problem...

Lets talk about the damage to the car instead.
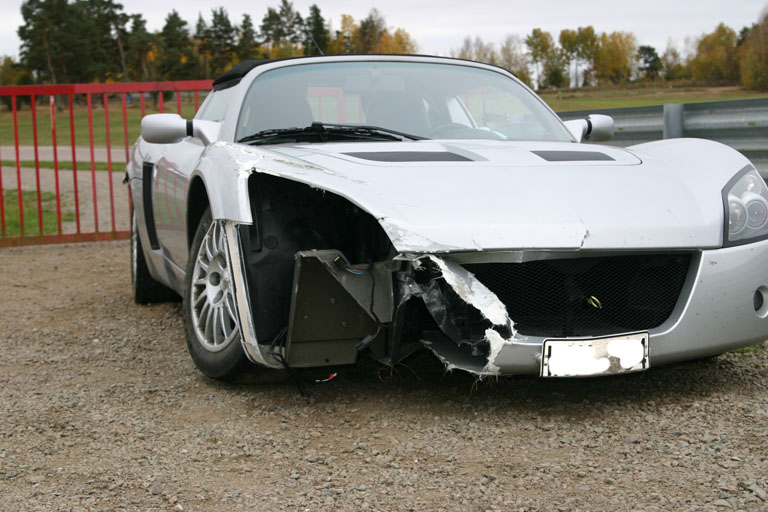
As I said I hit the front and rear right corners almost directly from the side bouncing into the armco. Ofcourse the front and rear clams were damaged and front and rear right light clusters, this was the obvious at a first glance. The front wheel also got a quite dramatic camber angle which made me shure that the wishbones were heavily bent and it also ment that i was afraid the I got some damage to the alu chassi itself, fortunatly this was not the case...

Here are some pictures: (don't have too many, wasn't too keen on taking pictures at the time)

Posted Image

Posted Image

I realised directly that it was going to cost me to put it back together again, my inshurance doesn't cover damage on track so the only way I could afford it was to do the work myself fith the help of some good friends. Thank you guys! chinky chinky Imnotworthy thumbsup

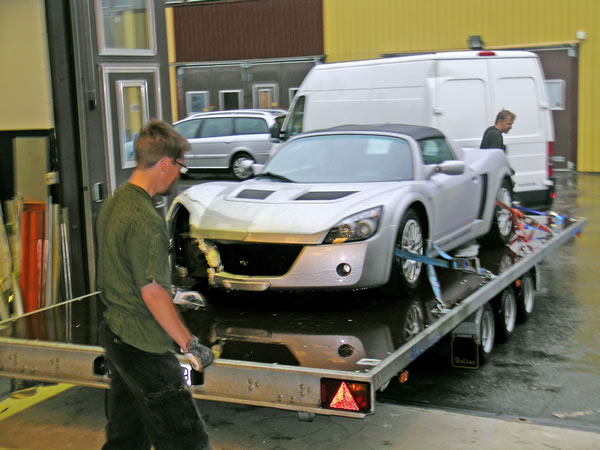
Was able to get my dad and a friend of his to pick up a trailer from Dude and then drive the 200 km or something to pic me up at the track... We then went back and I left the car at Dudes place for a week before he took it to his garage and we could start the process of taking it apart to inspect the damage:

Posted Image

Posted Image
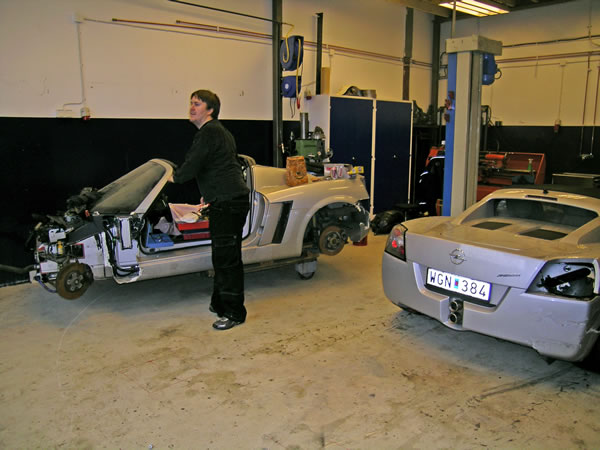
my damaged speedster not alone in the garage.

I took three of us between two and three hours to remove the front and rear clam, front right suspension and remove the rear subframe together with all the parts needed to do so... I was impressed and ofcourse we didn't have time to take many pictures, but here are a few:

Posted Image
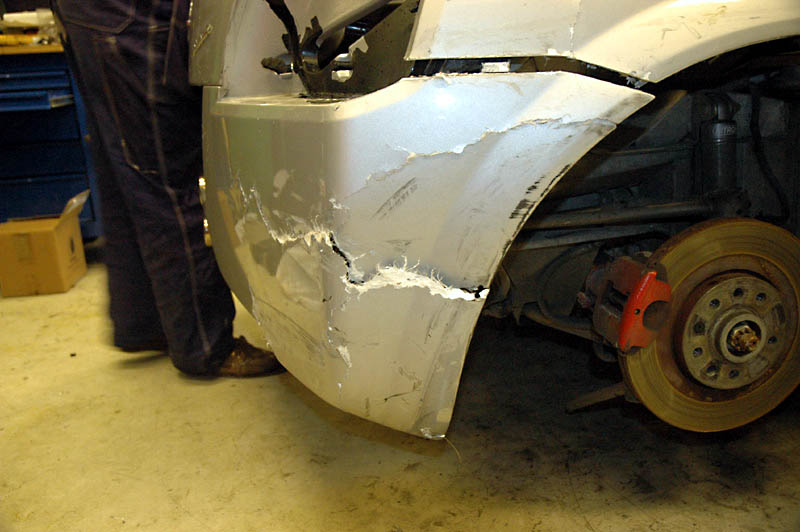
the visible damage to the rear
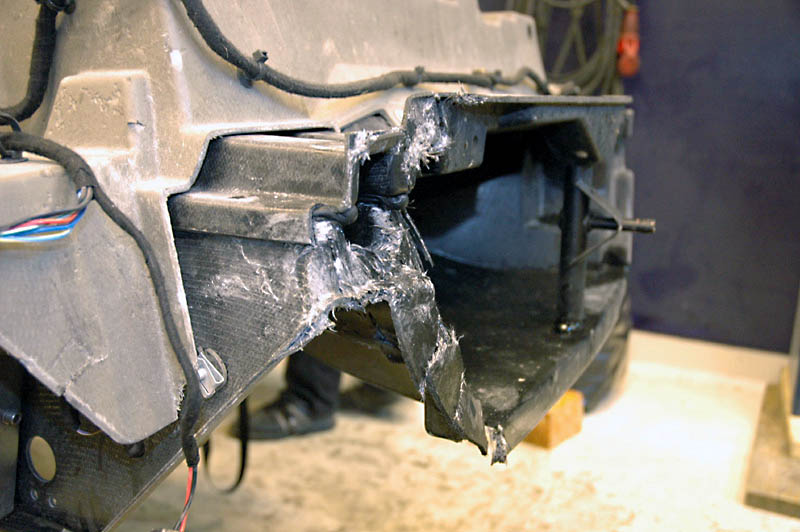
Posted Image
crashbox damage

Posted Image
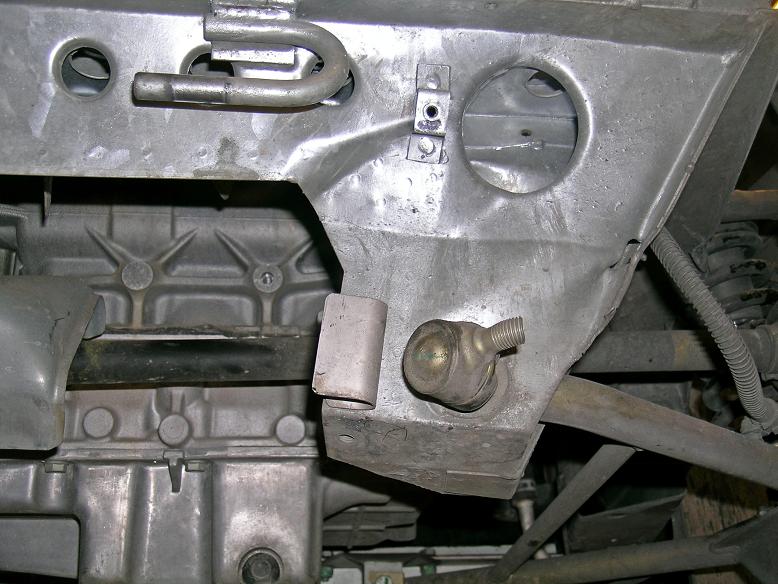
front right suspension damage

Posted Image
me taking it apart

Posted Image
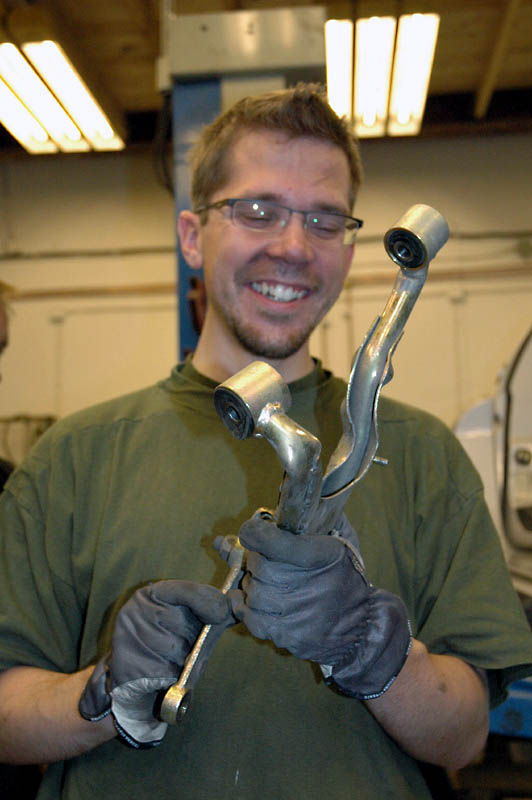
me laughing at the new innovative shape of the front upper wishbone

Posted Image
rear subframe bent and the toe rod has snapped.

can't put more than 10 pictures in a post so this is all for now, stay tuned... :P ;)

Edited by meldert, 24 July 2006 - 12:22 AM.


#2 meldert

meldert

    Billy No Mates

  • PipPipPipPipPip
  • 1,284 posts
  • Gender:Male
  • Location:Eskilstuna, Sweden

Posted 24 July 2006 - 12:21 AM

The story continues...

Posted Image
Slimvince and Dude removing the exhaust

Posted Image
Dude contemplating the situation

Posted Image
Rear subframe removed

The damage was the following:
front clam
rear clam
front right light cluster
rear right light cluster
small damage to crashbox
small damage to the frame around the radiator
small damage to the top threads on the front right (nitron) damper
front upper wishbone heavily bent
front lower wishbone bent
rear subframe bent
rear right toe rod snapped
rear upper wishbone bent
rear lower wishbone bent
right drive shaft siezed in the jonts (they were completely stiff!)
front right rim bent sideways several inches!
rear right rim bent sideways several inches!

apperantly the rims took alot of the impact, you would not believe how bent they were... the wishbones toock the rest of the impact up front and at the back the subframe and driveshaft took quite a beating too. But by the look of things I would be able to fix it and since Dude had a written off speedster standing by with damage on the front left side I had all the parts i needed in the garage (I still owe him) The written of speedster didn't have the clams left but Dude had a undamaged front clam use when making the moulds to the race speedster and he also had clipping_points old rear clam with damage on the left side afte a little mishap in a roundabout the year before... More about the rearclam puzzle later.

I decided that the damage to the crashbox was so small (it was just the edge of it thar were damaged) that I could use some glassfiber plaster to fix that up, did the same with the glassfiber frame that sits around the radiator.

Posted Image
Posted Image
repairing the crash box, this is probably not advisable, but in my case the damage was small so I decided to do it.

I used an undamaged front clam but applied plaster to the joints in it and smoothed them out.

the rear clam was a much more interesting project, since my rear clam didn'r have too much damage (only the right corner) and Dude had another rear clam with damage to the left side we decided to try and see if we could join them together thus making one whole clam out of two damaged one, It wasn't like I had anything to loose. If it din't work I would only have to by a new one anyway so her we go...

Dude got agressive with an angle grinder when i was busy with other things... And we ended up with two halves, we the screwed them together with the help of a wef aluminium plates and the applied glassfiber and polyester to the inside:

Posted Image
Posted Image
Posted Image
Posted Image

to be continued...

#3 meldert

meldert

    Billy No Mates

  • PipPipPipPipPip
  • 1,284 posts
  • Gender:Male
  • Location:Eskilstuna, Sweden

Posted 24 July 2006 - 12:40 AM

Then finishing with plaster and filler on the outside:

Posted Image
Posted Image
Posted Image
Posted Image

Then it was off with all the parts to to the paintshop... Well, I kind of stripped everyting first (the doors etc)
The guy there did the finishing preparations befor the paint and the result can be viewed in the following thread:

New (vx Unique?) Colour, changing from silver to...

Oh and the paint guy was very impresse by our work on the rear clam, after painting it, it's impossible to se that we have actually joind two pieces together... I cant believe it myself...

As I had the whole car taken apart I couldn't help upgrading it a bit...

Posted Image
A new fly wheel was fitted, I decided to do this after we had fitted the new rear subframe... It would have been so much easier to do it when the subframe was gone... Well I managed to do it buy myself one saturday evening anyway.

With the rear frame removed and the exhaust removed I just had to fit another exhaust... but which one should I choose? Well sine I did everything else by myself (and with the help of Dude) I could aswell build an exhaust from scratch.

Read more about that here:

Exhaust, complete custom system

Well, here is a sneak peek too:
Posted Image

Another modification was the change to elise hub and ali belled brake discs and the fitment of OZ Ultraleggera F1 wheels int the somewhat provokative size: 15 inch... :P Light weight is the key here.

Posted Image
Posted Image
Posted Image
Posted Image

I have probably done a few more minor mods but the only thing worth mentioning is the fitment of harnesses and modification of the seats. Lets show that in the next post.

Edited by meldert, 24 July 2006 - 12:43 AM.


#4 meldert

meldert

    Billy No Mates

  • PipPipPipPipPip
  • 1,284 posts
  • Gender:Male
  • Location:Eskilstuna, Sweden

Posted 24 July 2006 - 01:12 AM

OK it's finally time to admit it... When I started on this little project I had no experience whatsoever when i comes to working on cars, OK I hade fitted Nitrons to my car but that was it. Only thing even close I had done before is building MTBs... Oh, and I have built an RC Helicopter too so I guess you can say I'm a bit mechanicly inclined... Fortunatly enough I have had Dude around and have been able to call him and ask stupid questions... THANK YOU! Imnotworthy

Well this last part of the project is actually the only thing I have a bit of experience in and that has to do with sewing... :P poof ;)

I wanted to fit harnesses to keep me more secure in the seat when driving on track.

Posted Image
It's been discussed here before and I decided that for the harnesses to really work I needed to go through holes in the seat... For a while I played with the thought of buying some other type of seats, but I had tried the Reverie ones and they didn't really work for me and at this poin I also fas a bit short on cash... ;)

Instead I decided to modify the standard seat which I fit perfectly in anyway...

Posted Image

When I started to peel away the leather I decided to do a "frogman and tadpole" and fit the seats fith alcantara and carbonfiber effect syntetic leather instead...

Posted Image
off with the old leadther and then us that as a blueprint...

Posted Image
testing my sewing skills on some test pieces

Posted Image
then its time for the real deal

Posted Image
almost finished

Posted Image
my old "workhorse"

Posted Image
fitting it to the seat

Posted Image
detail

Posted Image
the finished seats


I believe thats all folks. Now I'm going to use the rest of the year to enjoy DRIVING the car... rallly ;) :lol:

#5 Smiler

Smiler

    Scary Internerd

  • PipPipPipPipPipPip
  • 5,352 posts
  • Location:Somewhere Ooop Norf!

Posted 24 July 2006 - 07:50 AM

Imnotworthy ... respect... very well done! Must be a great feeling to do something of this scale yourself. Plus you learn loads about the car in the process.. Enjoy... s

#6 christurbo

christurbo

    Scary Internerd

  • PipPipPipPipPipPip
  • 3,784 posts
  • Gender:Male
  • Location:UK
  • Interests:My Civic Type R
    My Black Beast of a VX!!!

Posted 24 July 2006 - 08:19 AM

This thread has actually now made me REALLY late for a client!!!! Fantastic innovation there matey! Rethsssspect! :lol:

#7 cheeky_chops

cheeky_chops

    Whipping Boy

  • PipPipPipPipPipPipPip
  • 7,922 posts
  • Gender:Male
  • Location:Solihull
  • Interests:my car, snowboarding and drinking

Posted 24 July 2006 - 08:56 AM

Wow, that is amazing! cant believe you boneded two half clams together Imnotworthy And all the other work you did! A big thumbsup thumbsup thumbsup to Dude and your other friends too

#8 Ferguson

Ferguson

    Need to get Out More

  • PipPipPipPip
  • 1,004 posts

Posted 24 July 2006 - 09:34 AM

Looks great. Looks better than the original. It's nice to see someone take on some major body repair work, and I think it's a good example to others that you don't need to be scared to go to work on the clams. I've repaired my fair share of glass, kevlar and carbon structures over the years (mostly boats) and it is not as daunting a task as many would think. The repairs I had to make weren't just bodged-on patches, mind you, as these were foam-core racing boats which required a high-quality finish. Some knowledge of what you want to do, high quality materials (no department store resins!), meticulous prep and a slow, methodical approach are the keys to success. As long as you don't try to fix the whole thing in one shot, and are willing to accept the rather laborious process of aligning, stabilizing, then building the repair up in careful steps, almost anyone (even those with two left hands, like me!) can achieve professional results. On Elisetalk you will also find some nice pictorials of clam repairs (autocrossers who were not willing to pay multiple thousands to fix cone damage on their "track dogs"). Again, fantastic result, great colour, and nice wheels :)

#9 vocky

vocky

    Moderator

  • 11,969 posts
  • Gender:Male
  • Location:Earth

Posted 24 July 2006 - 10:34 AM

wow, that's a lot of hard work and money gone into that :) a big :grouphug: to dude and anyone else who helped you achieve the rebuild thumbsup lets hope you have no more mishaps :rolleyes: but then again, it looks so much better now than before the last crash :P

#10 JimH

JimH

    Whipping Boy

  • PipPipPipPipPipPipPip
  • 8,074 posts
  • Location:Pitgober
  • Interests:yachting, diving, steam waggons, cars that don't break down, giving up on the output of any car builder from Norfolk.

Posted 24 July 2006 - 10:52 AM

I am very impressed with those glassing skills. Lovely.

I am also well jealous of that trailer.

#11 ferg

ferg

    Super Member

  • PipPip
  • 422 posts
  • Location:Norway

Posted 24 July 2006 - 11:25 AM

Absafuckinglutely awesome. Imnotworthy Can't wait to trash mine now :lol:

#12 Muncher

Muncher

    Scary Internerd

  • PipPipPipPipPipPip
  • 4,494 posts
  • Gender:Male
  • Location:Ipswich

Posted 24 July 2006 - 11:52 AM

VERY well done, bet you're pleased!


1 user(s) are reading this topic

0 members, 1 guests, 0 anonymous users