Jump to content


Photo

My New Project


  • Please log in to reply
488 replies to this topic

#341 haggi961

haggi961

    1cobrav8 is my god

  • PipPipPipPipPipPipPip
  • 6,003 posts
  • Gender:Male
  • Location:Richmond, N.Yorks
  • Interests:Keeping fit and in shape, and pretty much anything to do with an engine.

Posted 23 August 2009 - 05:06 PM

Yep, the standard roof cleaning kit thumbsup


I've also tried the Meguiars kit - the cleaner is a bit better than the Autoglym one, but the waterproofer is nowhere near as good :rolleyes:


right i might try them both and get the best of both worlds, cheers

#342 mandarinvx

mandarinvx

    King of First Replies

  • PipPipPipPipPipPipPipPip
  • 12,621 posts
  • Gender:Male
  • Location:West Mids / Oxfordshire

Posted 23 August 2009 - 10:31 PM

Vocky very kindly re-assembled my head today - so in went the:

Stainless Steel Nitrated Intake Valves
Inconel Exhaust Valves
Single Groove Keepers (2 per valve)
Large Outer Springs
Small Inner Springs
Titanium Retainers
Valve Spring Seats
Valve Stem Seals
Comp Stage 1 Cams

B)

Posted Image

Posted Image

Posted Image

Posted Image

Posted Image

Posted Image

#343 Rocky

Rocky

    Member

  • Pip
  • 96 posts
  • Location:Frome, Somerset

Posted 27 August 2009 - 09:50 AM

Looking at the close up picture of the valves, it looks like the head is made of polystyrene!!!

#344 Zoobeef

Zoobeef

    Joes bedroom assistant.

  • PipPipPipPipPipPipPip
  • 11,103 posts
  • Gender:Male
  • Location:Retford/Bovington

Posted 27 August 2009 - 09:53 AM

Looking at the close up picture of the valves, it looks like the head is made of polystyrene!!!


see what you mean, looks wierd

#345 oakmere

oakmere

    Scary Internerd

  • PipPipPipPipPipPip
  • 2,143 posts

Posted 27 August 2009 - 03:13 PM

That is because polystyrene is used in the casting process. Oakmere

#346 JG

JG

    Newbie

  • 13,612 posts
  • Gender:Male
  • Location:West Berks

Posted 27 August 2009 - 03:30 PM

:yeahthat: Its actually used to make the cast.

#347 siztenboots

siztenboots

    RaceMode

  • 26,613 posts
  • Gender:Not Telling
  • Location:Surrey
  • Interests:french maids

Posted 27 August 2009 - 04:16 PM

rubbish, the engine is polystyrene just sprayed with some hammerite silver paint

#348 mandarinvx

mandarinvx

    King of First Replies

  • PipPipPipPipPipPipPipPip
  • 12,621 posts
  • Gender:Male
  • Location:West Mids / Oxfordshire

Posted 27 August 2009 - 06:07 PM

:D

Yep, it's a Lost Foam process thumbsup

#349 Jameshs

Jameshs

    Scary Internerd

  • PipPipPipPipPipPip
  • 3,511 posts
  • Gender:Male
  • Location:Copthorne, Nr Gatwick
  • Interests:Cars and Rock Climbing

Posted 27 August 2009 - 09:13 PM

rubbish, the engine is polystyrene just sprayed with some hammerite silver paint


Thats what makes it lighter than a tubby :lol:

#350 mandarinvx

mandarinvx

    King of First Replies

  • PipPipPipPipPipPipPipPip
  • 12,621 posts
  • Gender:Male
  • Location:West Mids / Oxfordshire

Posted 28 August 2009 - 09:08 PM

Bought a Saab turbo manifold to have a play with

Good news is - it fits, and so does the standard TB, it also uses the same M6 bolts/pattern as the head

Posted Image

Posted Image

Posted Image

It's surprisingly light for a cast aluminium intake :) and all runners appear to be equal length (around 19cm) despite what I've read previously. It is deceptive tho, but the central two runner sweep around the outside of the plenum, I've tried to take a photo - it has't really worked :D

Posted Image

Posted Image

I'll need to cut a slot in the gasket (still to purchase from Saab) for the PCV valve

I could do with doing a direct comparison to a 2.2 manifold, so if anyone has one lying around :poke: chinky chinky

#351 mandarinvx

mandarinvx

    King of First Replies

  • PipPipPipPipPipPipPipPip
  • 12,621 posts
  • Gender:Male
  • Location:West Mids / Oxfordshire

Posted 28 August 2009 - 09:32 PM

A couple of pics showing the runners

Posted Image

Posted Image

Posted Image

Looks like it's time to get the Dremel out again :D There's actually quite a bit of scope for porting :)

Posted Image

#352 haggi961

haggi961

    1cobrav8 is my god

  • PipPipPipPipPipPipPip
  • 6,003 posts
  • Gender:Male
  • Location:Richmond, N.Yorks
  • Interests:Keeping fit and in shape, and pretty much anything to do with an engine.

Posted 28 August 2009 - 09:44 PM

this all looks complicated mate lol will it give you more bhp when its all fitted.

#353 mandarinvx

mandarinvx

    King of First Replies

  • PipPipPipPipPipPipPipPip
  • 12,621 posts
  • Gender:Male
  • Location:West Mids / Oxfordshire

Posted 28 August 2009 - 10:20 PM

It will if it has a Rotrex bolted onto it :lol: It had been dismissed as an option for NA applications due to unequal runner lengths, but it seems that is not really the case. The plenum chamber may be smaller tho - I need to get hold of a stock 2.2 manifold to compare them really :)

#354 Crazyfrog (Fab)

Crazyfrog (Fab)

    Iceman

  • 22,801 posts
  • Gender:Not Telling

Posted 28 August 2009 - 10:23 PM


pm thumbsup adam lol

#355 mandarinvx

mandarinvx

    King of First Replies

  • PipPipPipPipPipPipPipPip
  • 12,621 posts
  • Gender:Male
  • Location:West Mids / Oxfordshire

Posted 28 August 2009 - 10:36 PM

PM'd

#356 mandarinvx

mandarinvx

    King of First Replies

  • PipPipPipPipPipPipPipPip
  • 12,621 posts
  • Gender:Male
  • Location:West Mids / Oxfordshire

Posted 29 August 2009 - 06:55 PM

Ball Joint Replacement Mini-Guide :)

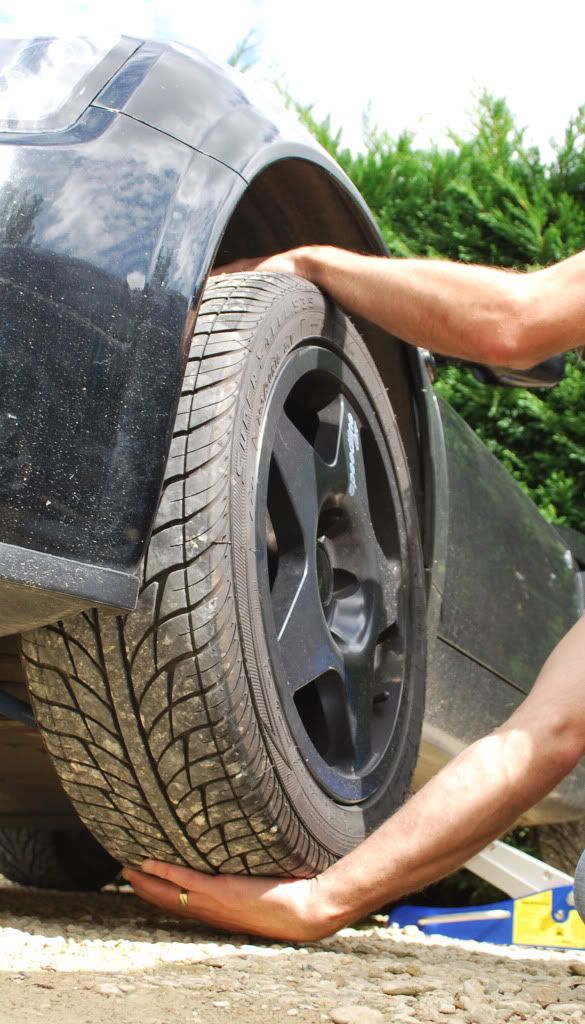
Right then, a mini guide to ball joint replacement. The ball joints form part of the MOT and if there is wear then the car can fail

The way to check is to grab the wheel top and bottom and check for any play, or more like a 'clunk'

Posted Image

The bottom ball joint had failed on mine, so that was the one to be replaced, it can be quite hard to tell whether it's top / bottom / wheel bearing tho

What you'll need:

Jack (2 if the ball joint starts turning, this didn't happen to me)
Wheel brace
19mm Open End Spanner
19mm Socket
8mm Allen Key (pref bit, socket mounted)
5mm Allen Key (pref bit, socket mounted)
Hammer
Small Wire Brush
Eliseparts Ball Joint Removal Tool
Ball Joint Seperator (fork type used here)
Copper Grease
Silicon Grease


Onto replacement - first thing to mention is that this is a PITA of a job - lots to do for such a small component :rolleyes: It's well worth investing in the right tools thumbsup

Jack and support the car, then remove the wheel. The undo both caliper bolts using an 8mm allen bit

Posted Image

pull on the back of the pads to spread them enough to get over the lip in the disc - if this is tight then slacken off the brake fluid resevoir cap :)

Once removed, rest the caliper out of the way, do not let the caliper dangle on the rubber hose!

Posted Image

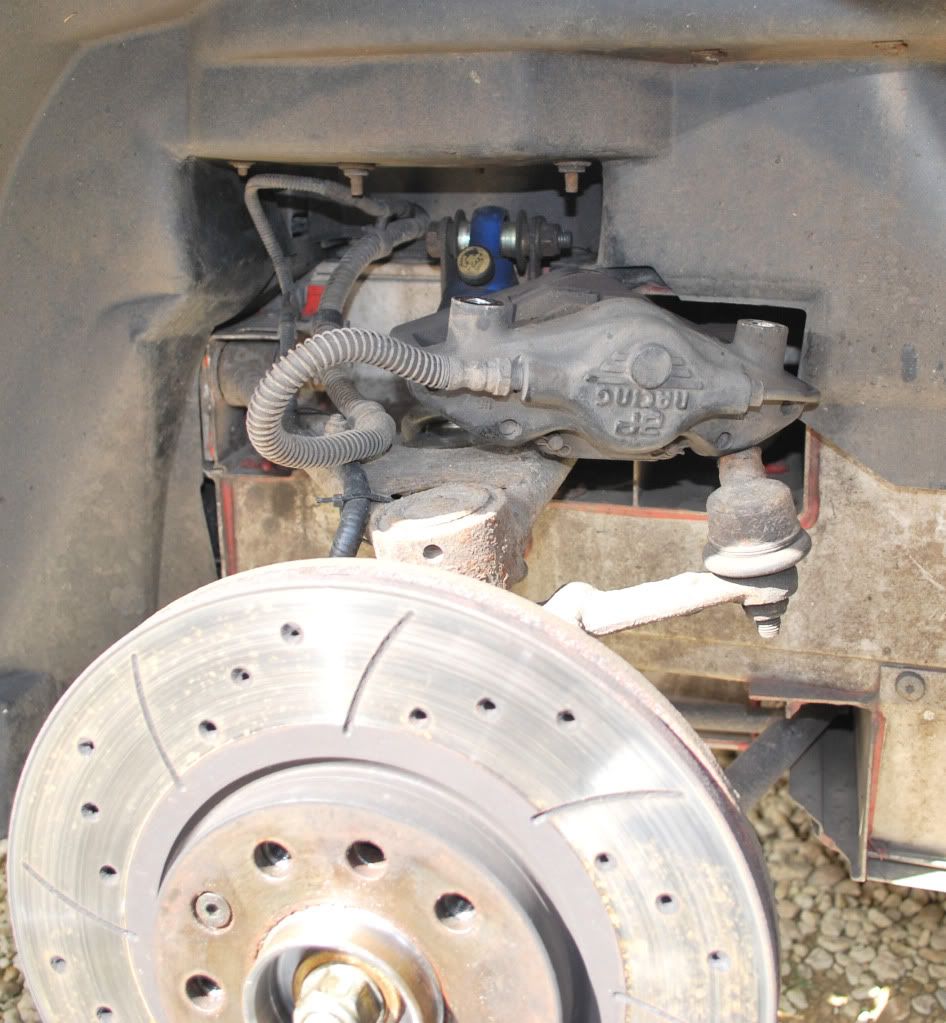
Now remove the brake disc by removing the retention pin with a 5mm hex bit - best to use a proper bit and socket as you could well round them off using a small ill-fitting key

Posted Image

Clean the visible section of the thread on the ball joint thoroughly with a small wire brush - time spent here will save time using a Dremel later B)

Posted Image

Use the 19mm spanner to undo the nut - this one came off (although I had to use my foot as a lever, the thing was so tight :rolleyes:) but often you'll have to cut a slot into the side of the nut with a Dremel cutting disc. If the nut simply starts to spin then it could be the balljoint spinning in its socket - in this case just use a jack or piece of wood as leverage from underneath (not so easy if it's the top one you're doing tho!)

Posted Image

Posted Image

#357 mandarinvx

mandarinvx

    King of First Replies

  • PipPipPipPipPipPipPipPip
  • 12,621 posts
  • Gender:Male
  • Location:West Mids / Oxfordshire

Posted 29 August 2009 - 07:02 PM

Then use the fork type seperators between the hub carrier and the wishbone - I think I'll invest in a bigger version as this small one was very hard work :o

Posted Image

Then use the Eliseparts kit to extract the old ball joint - the kit comes with instructions, but for reference I used the smaller diameter of the two spacers that are provided. You may need to use a jack handle or similar for extra leverage :D

Posted Image

And removed... breathe...

Posted Image

Posted Image

It's a good idea to put the ball joint in the freezer in an effort to reduce its diameter as much as poss, I don't have a freezer so mine was only fridge temp :) - put a bit of silicon grease around the boot so it doesn't get caught on the wishbone when being inserted:

Posted Image

And then use the ball joint tool to re-assemble, this time without the spacer. There are inspection holes to track progress of how far the ball joint has travelled

Posted Image

And nearly there:

Posted Image

Now just refit everything - you may need to take the cap off the brake fluid resevoir if you didn't before, but remember to refit it!

MAKE SURE you pump the brake pedal a few times prior to driving off :borg:

#358 FrankenJim

FrankenJim

    Super Duper Member

  • PipPipPip
  • 653 posts

Posted 30 August 2009 - 02:34 AM

Dam how did you learn how to do all this? Great stuff mate thumbsup What you got left to do ? Jim

#359 mandarinvx

mandarinvx

    King of First Replies

  • PipPipPipPipPipPipPipPip
  • 12,621 posts
  • Gender:Male
  • Location:West Mids / Oxfordshire

Posted 30 August 2009 - 10:14 AM

Techieboy helped me with the last one, so I had the confidence to have a go with this one thumbsup Quite a list of things to do really, including: Remove rear clam Fit exhaust Change timing chain Swap heads Full suspension refurb (tho that will be on the back burner)

#360 Ouchie

Ouchie

    Monkey no mates

  • PipPipPipPipPipPip
  • 4,805 posts
  • Gender:Male
  • Location:Gloucestershire

Posted 30 August 2009 - 10:37 PM

I left the disc on but unhooked the track rod end from the steering arm as I thought that would be easier and give better access. It worked out ok but the threaded tips of the ball joints really need to be cleaned up first just like the drop links. Corrosion and build up really cause a problem. I wish I removed the disc instead :rolleyes: In the instructions for the Eliseparts removal tool it says to cut away the rubber boot. Did you not bother? Only ask as it is not clear in the picture but also because I cut away most of the rubber but did not remove all of it and ended up sandwiching the metal wire ring that holds the rubber boot in place between the wishbone and the removal tool :tt: Grrr :dry: Will you attempt the timing chain yourself or get Benny to do it? I wonder if he will do a group-buy :lol: I have some crappy pictures from when I did mine but nowhere near as good as yours.


2 user(s) are reading this topic

0 members, 2 guests, 0 anonymous users