Thanks for reply, I'll get a set of those bolts ordered then me thinks.
Let me know if you find a set of black locking wheels bolts.
Cheers.

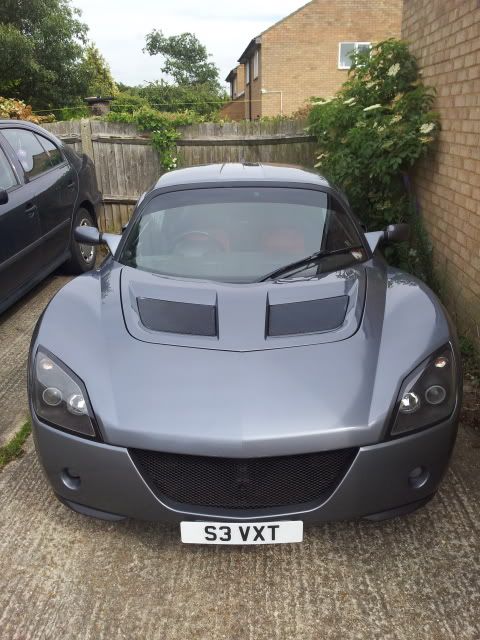
My Moonland Grey Vx220 Turbo
Started by
Aaron D
, Dec 30 2010 04:37 PM
71 replies to this topic
#41

iVXT
-

-

- 680 posts
Super Duper Member
- Gender:Male
- Location:North West
Posted 19 January 2011 - 11:56 PM
#42
techieboy
-

-

- 22,914 posts
Supercharger of Doom
- Gender:Male
- Location:Bedford
Posted 20 January 2011 - 12:07 AM
Do yourselves favours and bin locking wheel nuts before they let you down.
#43
iVXT
-
-
- 680 posts
Super Duper Member
- Gender:Male
- Location:North West
Posted 20 January 2011 - 12:28 AM
Do yourselves favours and bin locking wheel nuts before they let you down.
Let me down in what way? Never had a problem with them on any car before.
Cheers.
Edited by iVXT, 20 January 2011 - 12:29 AM.
#44
2.2_na
-

-
- 6,323 posts
No Compromise
- Gender:Male
- Location:London
Posted 20 January 2011 - 12:31 AM
Never had a problem with them on any car before.
Me neither.
#45
techieboy
-
-
- 22,914 posts
Supercharger of Doom
- Gender:Male
- Location:Bedford
Posted 20 January 2011 - 12:50 AM
There are stacks of posts on here with people whingeing about their "key" rounding off and asking how to remove the locking bolt (which takes all of 30 seconds anyway). The other problem is it's kept under the bonnet and sods law says the time you need to get it out, your bonnet release breaks. Total waste of time and barely more secure than not having them at all.
#46
Aaron D
-
-
- 149 posts
Member
- Gender:Male
- Location:Bedfordshire
- Interests:Work, Motor Racing, Xbox, Local Pub, Motorbikes
Posted 20 January 2011 - 08:12 AM
I've always had locking wheel nuts, at one point two sets on one car, and i've found that the vauxhall ones are the worst. Funnily enough. But I guess it's down to how you treat them!
All my nuts (wheels!) get a bit of copper slip to keep them from sticking permanently, as does the locking wheel nut. The locking nut is also torqued to about half the torque of the others so it's not an absolute effort to get it off but tight enough to not let someone get away with them.
They give me a peace of mind, so they're gonna stay. Especially living in Luton!!!
#47
iVXT
-
-
- 680 posts
Super Duper Member
- Gender:Male
- Location:North West
Posted 20 January 2011 - 07:26 PM
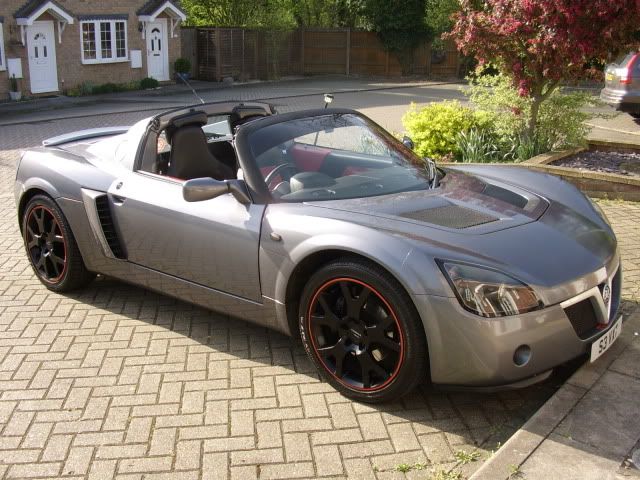
Update from 13/01/2011
These belong in here!
Absolutely quality.
Must say the hardtop looks superb in moonland. I only use my car in good weather (mainly roof off) but it's tempting to have one when I can afford it.
Is this off jonnyboy? You pleased with the finish? Also do you get a bag with it for when not on the car out of interest?

#48
Aaron D
-
-
- 149 posts
Member
- Gender:Male
- Location:Bedfordshire
- Interests:Work, Motor Racing, Xbox, Local Pub, Motorbikes
Posted 21 January 2011 - 12:44 PM
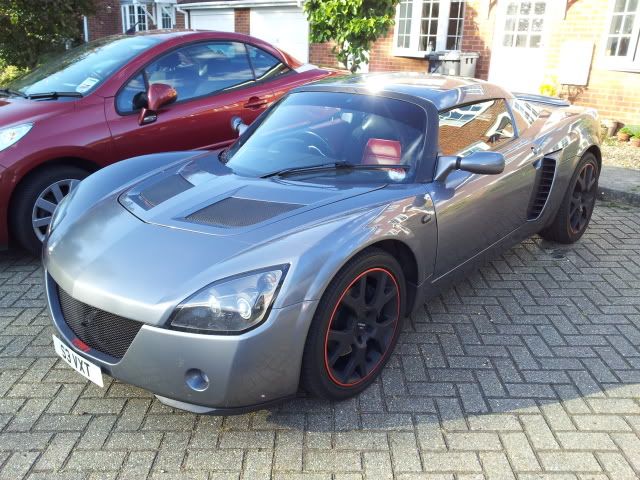
Yeah got it off Jon and it's 100% spot on. I can't find any fault with it. When i'm ready to take the roof off for the nice weather i'll be ordering myself a hardtop bag 
#49
Aaron D
-
-
- 149 posts
Member
- Gender:Male
- Location:Bedfordshire
- Interests:Work, Motor Racing, Xbox, Local Pub, Motorbikes
Posted 25 May 2011 - 09:51 AM
I haven't really posted an update for a while so I guess i'll just have to try and remember what i've done.
Little number plate: Already lost one to a rather large speedbump
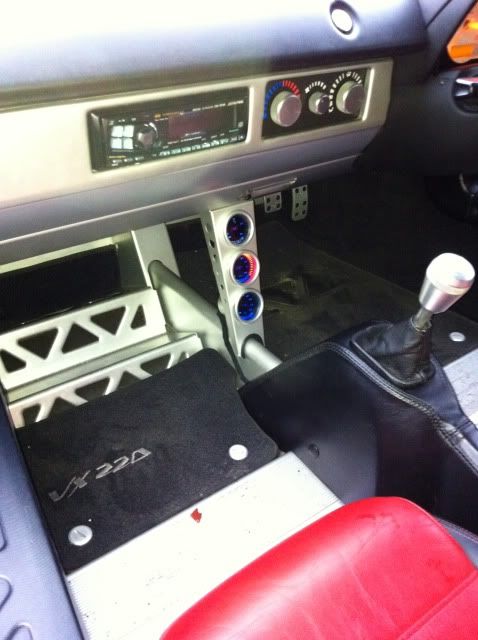
Boost, Oil Pressure and Oil Temperature Gauges: Yet to eart the pressure sensor though.
Red Rim Tape: Probably going to come off shortly.
Red tow hooks front and back: Likely to take the TOW decals off though and leave the front tow hook off, or replace with one of those hooked jobbies.

No pictures of the actual tow hooks wierdly.
Lastly, I eventually got the bloody front clam off after 15 hours of work on some of the bolts that'd just generally died. Been replaced with stainless items and copper slipped. And then the front grill came off.
With or without tow hook?
Little number plate: Already lost one to a rather large speedbump
Boost, Oil Pressure and Oil Temperature Gauges: Yet to eart the pressure sensor though.
Red Rim Tape: Probably going to come off shortly.
Red tow hooks front and back: Likely to take the TOW decals off though and leave the front tow hook off, or replace with one of those hooked jobbies.
No pictures of the actual tow hooks wierdly.
Lastly, I eventually got the bloody front clam off after 15 hours of work on some of the bolts that'd just generally died. Been replaced with stainless items and copper slipped. And then the front grill came off.
With or without tow hook?
#50
techieboy
-
-
- 22,914 posts
Supercharger of Doom
- Gender:Male
- Location:Bedford
Posted 25 May 2011 - 09:56 AM
Thank fcuk for that.Red Rim Tape: Probably going to come off shortly.
Likely to take the TOW decals off though
#51
Whiteboy
-

-
- 6,950 posts
Whipping Boy
- Gender:Male
- Location:Near Hethel, Norfolk
- Interests:F1, track days, cars ,cars and cars.
Posted 26 May 2011 - 09:39 AM
While the V is off spray it moonland and put it back on.  Steve
Steve
Steve
#52
Aaron D
-
-
- 149 posts
Member
- Gender:Male
- Location:Bedfordshire
- Interests:Work, Motor Racing, Xbox, Local Pub, Motorbikes
Posted 02 June 2011 - 12:24 AM
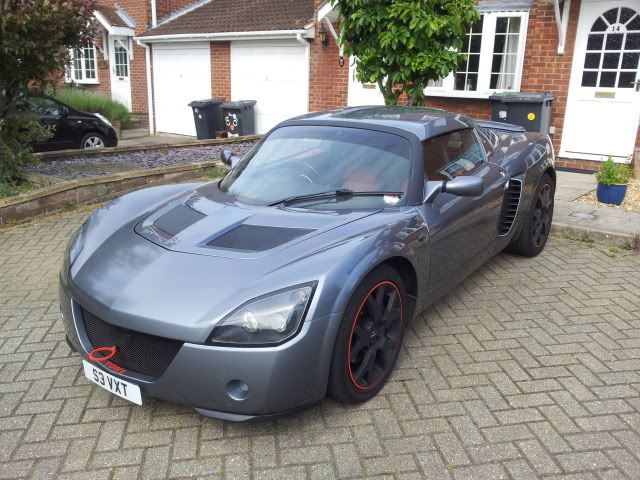
Stupid tow stickers are off now, looks so much better.
The red rim tape comes off next wash.
The red rim tape comes off next wash.
#53
2.2_na
-
-
- 6,323 posts
No Compromise
- Gender:Male
- Location:London
Posted 02 June 2011 - 12:42 AM
Stupid tow stickers are off now, looks so much better.

It looks good now.

#54
TazN
-
-
- 2,931 posts
Scary Internerd
- Gender:Male
- Location:Suffolk
- Interests:Video Games, Airsoft, American Football, Cars
Posted 02 June 2011 - 08:46 AM
The red rim tape comes off next wash.
Will look even better soon
#55
Aaron D
-
-
- 149 posts
Member
- Gender:Male
- Location:Bedfordshire
- Interests:Work, Motor Racing, Xbox, Local Pub, Motorbikes
Posted 04 June 2011 - 11:17 AM
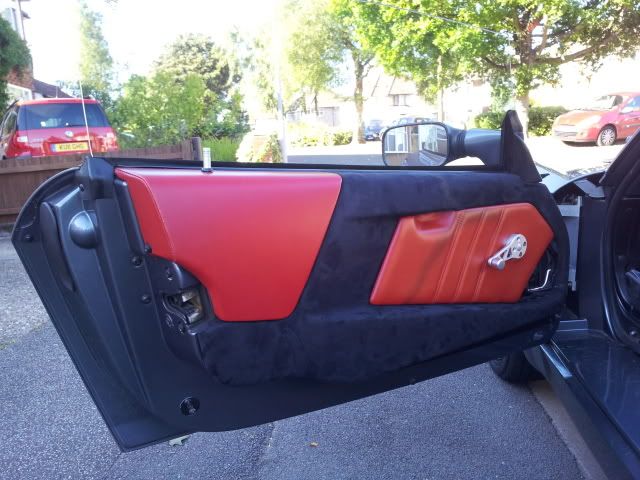
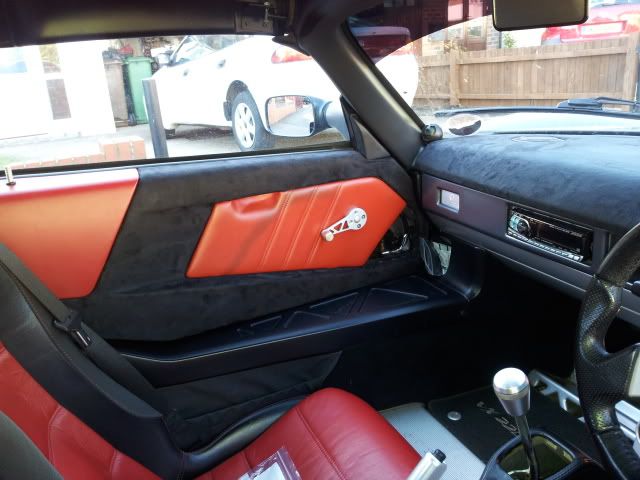
As per my thread, i've retrimmed my door panels and the dash.
http://www.vx220.org...31#entry1198131
http://www.vx220.org...31#entry1198131
#56
Aaron D
-
-
- 149 posts
Member
- Gender:Male
- Location:Bedfordshire
- Interests:Work, Motor Racing, Xbox, Local Pub, Motorbikes
Posted 14 June 2011 - 07:35 PM
Progress update!!!!
And i'm sorry to disappoint some of you... But unfortunately, it's not that the rimtape has come off!!! Yet...
A couple of months back I bought some Carbon Fibre APR GT3 Spec wing mirrors. Obvious problem, they don't make baseplates for the VX220. So I've had to learn some skills and start producing a set of my own.
So I started by removing my mirrors and losing those stupid bolts in the bottom of the door and measuring up the bolt holes on the reverse of the mirror, and tracing around the mirror/door face itself for a general shape. In hindsight... I'd have done this onto some card or something instead of the plate of 10mm thick aliminium I bought and saved myself a lot of time. So with the lines drawn, I decided to cut. Que 3mm Titanium drill bit, Pillar drill and lots of time! I'm sure there was an easier way...
So then I have to file it to shape... Again, i'm sure there was a quicker way.
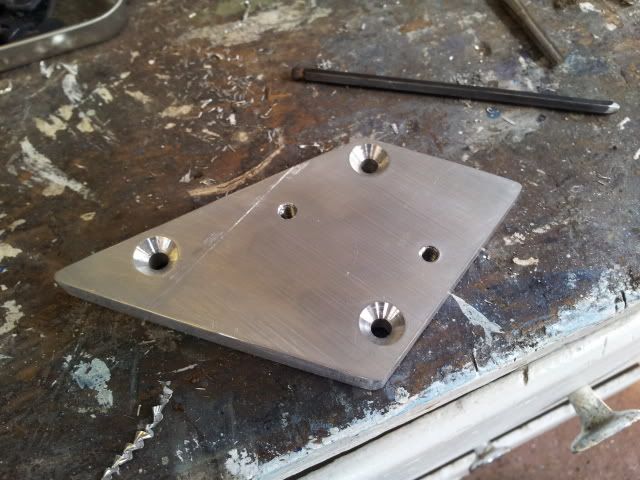
So, the plan was to drill 8mm down into the metal at the mounting points and tap the holes so it'd be flush on the outside. Cracking plan. But after getting everything set up and test drilled (i'd never drill/tapped holes before!) it was suggested by my grandad I used a 0.20mm larger drill bit to make the tapping easier. He gave me a 1.20mm larger bit by mistake, i didn't double check (doh!) and so i taped the holes bigger. Which wouldn't of been a problem but I weren't prepared to go and by a third set of bolts M6 size that I didn't think woiuld fit in the holes. But luckily i'd bought some countersink bolts as Plan B. So i countersunk the exterior holes.
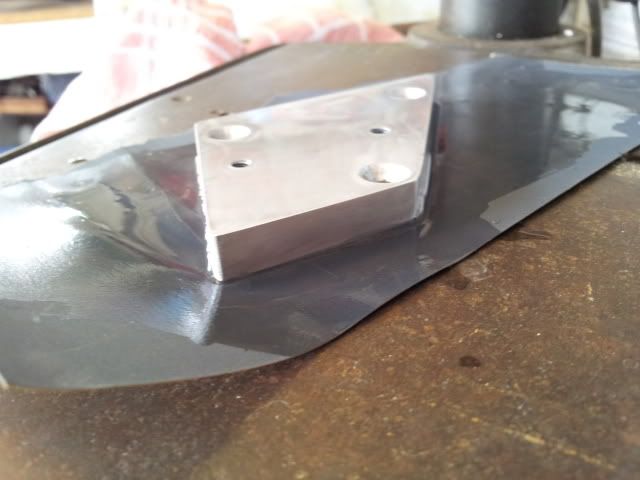
And offered it up to the door in place of the mirror.
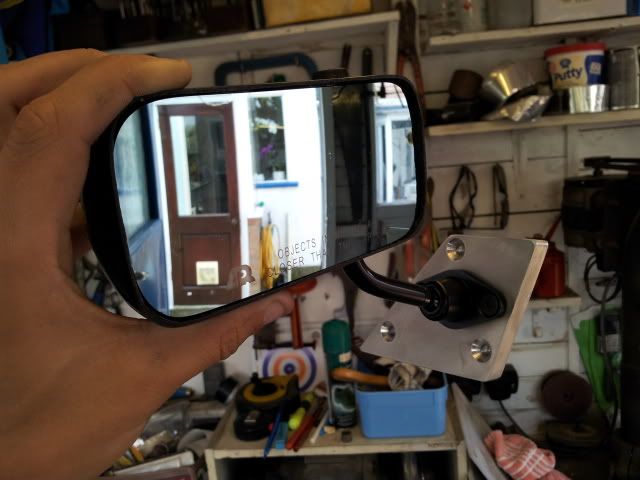
And after re-jigging the dimensions and filing the sides flatter, drilled and tapped the mounting holes for the actual mirror stalk itself.
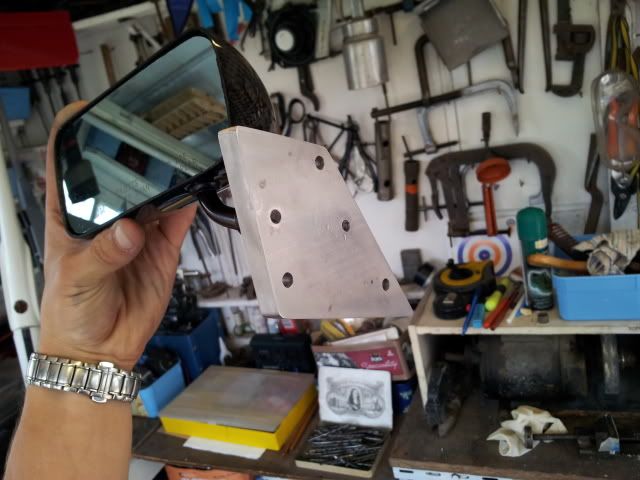
A bit of wet and dry on the faces and sides. Went through grades 120, 600, 1200 and finished with 2500.
And now the (almost) finished article, mounted to the mirror.
And offered up to the car. The finished article will be powder coated or anodised in black.
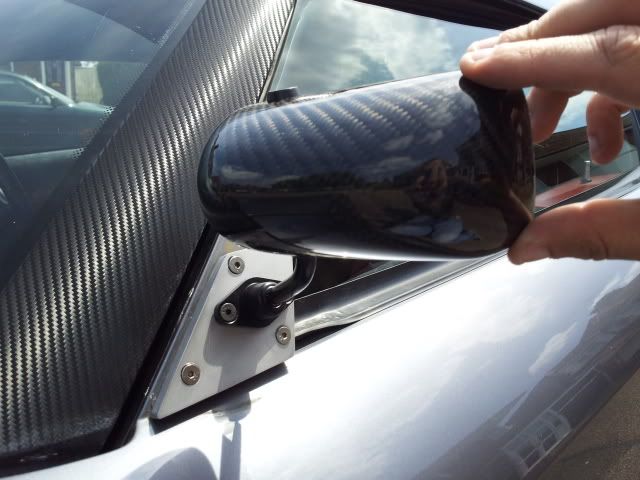
This will act as my template for a new set I will produce. I've polished the nuts off of it for fun with Autosol and when it's done serving it's purpose I think I might mount it up and keep it on display as my first ever development. Never thought i'd do something like this but now I've got the experience, once i've done the baseplates proper i'll move onto my next project which might be a fancy fancy gearbox breather - just for the fun of it.
And i'm sorry to disappoint some of you... But unfortunately, it's not that the rimtape has come off!!! Yet...
A couple of months back I bought some Carbon Fibre APR GT3 Spec wing mirrors. Obvious problem, they don't make baseplates for the VX220. So I've had to learn some skills and start producing a set of my own.
So I started by removing my mirrors and losing those stupid bolts in the bottom of the door
and measuring up the bolt holes on the reverse of the mirror, and tracing around the mirror/door face itself for a general shape. In hindsight... I'd have done this onto some card or something instead of the plate of 10mm thick aliminium I bought and saved myself a lot of time. So with the lines drawn, I decided to cut. Que 3mm Titanium drill bit, Pillar drill and lots of time! I'm sure there was an easier way...So then I have to file it to shape... Again, i'm sure there was a quicker way.
So, the plan was to drill 8mm down into the metal at the mounting points and tap the holes so it'd be flush on the outside. Cracking plan. But after getting everything set up and test drilled (i'd never drill/tapped holes before!) it was suggested by my grandad I used a 0.20mm larger drill bit to make the tapping easier. He gave me a 1.20mm larger bit by mistake, i didn't double check (doh!) and so i taped the holes bigger. Which wouldn't of been a problem but I weren't prepared to go and by a third set of bolts M6 size that I didn't think woiuld fit in the holes. But luckily i'd bought some countersink bolts as Plan B. So i countersunk the exterior holes.
And offered it up to the door in place of the mirror.
And after re-jigging the dimensions and filing the sides flatter, drilled and tapped the mounting holes for the actual mirror stalk itself.
A bit of wet and dry on the faces and sides. Went through grades 120, 600, 1200 and finished with 2500.
And now the (almost) finished article, mounted to the mirror.
And offered up to the car. The finished article will be powder coated or anodised in black.
This will act as my template for a new set I will produce. I've polished the nuts off of it for fun with Autosol and when it's done serving it's purpose I think I might mount it up and keep it on display as my first ever development. Never thought i'd do something like this but now I've got the experience, once i've done the baseplates proper i'll move onto my next project which might be a fancy fancy gearbox breather - just for the fun of it.
#57
techieboy
-
-
- 22,914 posts
Supercharger of Doom
- Gender:Male
- Location:Bedford
Posted 14 June 2011 - 07:42 PM
For a 2 minute job, you're sure taking a long time over it. Time to fess up and admit you like it.But unfortunately, it's not that the rimtape has come off!!! Yet...

#58
Aaron D
-
-
- 149 posts
Member
- Gender:Male
- Location:Bedfordshire
- Interests:Work, Motor Racing, Xbox, Local Pub, Motorbikes
Posted 14 June 2011 - 07:46 PM
For a 2 minute job, you're sure taking a long time over it. Time to fess up and admit you like it.
But unfortunately, it's not that the rimtape has come off!!! Yet...
Shhh!!!

I think the rebel inside me says that the more everyone says they hate it, the more I should keep it! In fairness the next detailing session i'm lining up will be around the wheels, so that's when they come off for me. Roll on the weekend!!!!
#59
Bumblebee
-

-
- 7,592 posts
.....
- Gender:Female
- Location:York
Posted 14 June 2011 - 08:45 PM
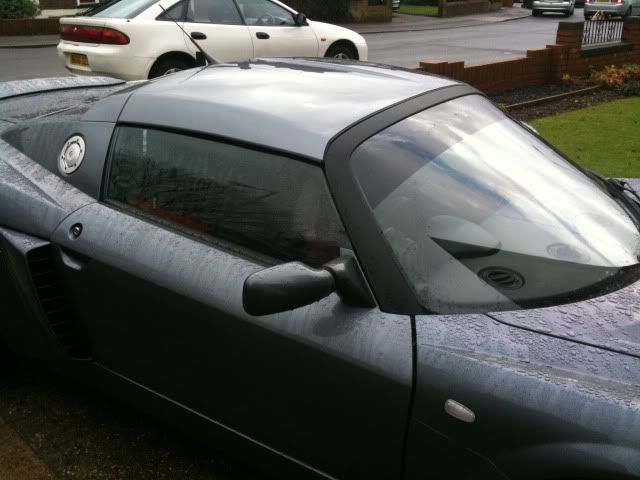
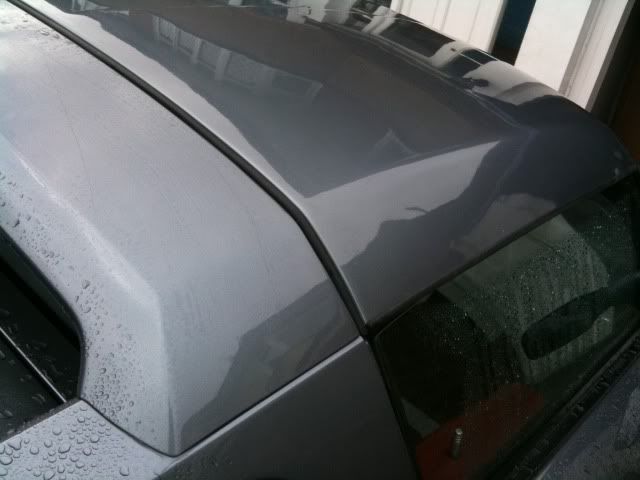
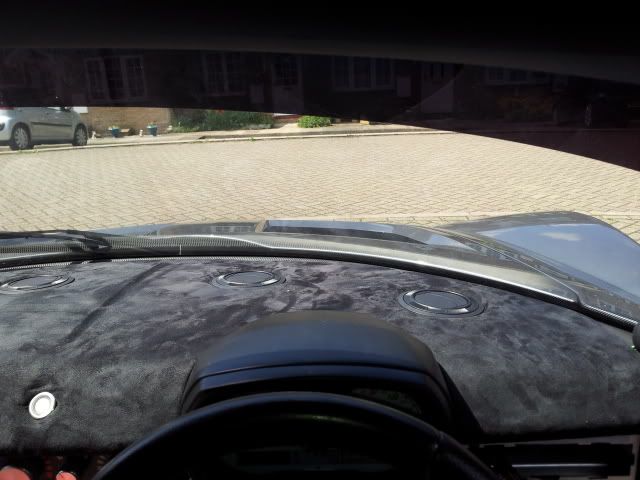
Is your windscreen surround wrapped in carbon?do u have any more pics?
Aimy
#60
Aaron D
-
-
- 149 posts
Member
- Gender:Male
- Location:Bedfordshire
- Interests:Work, Motor Racing, Xbox, Local Pub, Motorbikes
Posted 14 June 2011 - 09:16 PM
Is your windscreen surround wrapped in carbon?do u have any more pics?
Aimy
I do indeed and i'm afraid the only pics i've got are here in this thread

Cost me about £80 to get it done at TTints in Luton. Got mugged off i'm sure lol.


4 user(s) are reading this topic
0 members, 4 guests, 0 anonymous users

